iClip Window Behavior
You access iClip by simply moving your mouse cursor to the side of the screen that it's positioned on. It then slides out for you to use and automatically hides when you move your mouse cursor away from it.

Pin window button
You can click the pin button to keep iClip from hiding again when you move the mouse away.

Close window button
To allow iClip to hide again, click the close button.

iClip menu bar button
You can also show or hide the iClip window by clicking the iClip button in the menu bar.
If you add iClip to your Apple Dock, clicking on it will also show and hide iClip.
Copy & Paste

Copy button
iClip enables you to copy and paste clippings from and to its clip bins by using the buttons next to them. Clicking a Copy button next to a clip bin copies from the current application to the Clipboard, and then pastes the contents into the clip bin. The bin will then display an image that represents the contents of the clip that it contains. The Copy button can be quickly recognized by the fact that the arrow of its icon points toward the clip bin it controls.
Paste button
Likewise, if a clip bin contains a clipping, clicking a Paste button next to the bin copies the clipping it contains to the Clipboard, and then pastes the contents to the current application. The Paste button can be quickly recognized by the fact that the arrow of its icon points away from the clip bin it controls.
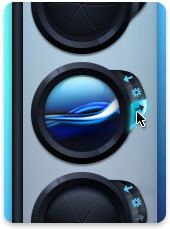
Action Button
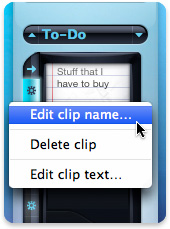
Action button
Clicking an Action button next to a clip bin opens a contextual pop-up menu to enable you to perform various functions on the clip bin.
Depending on what the bin contains, you can perform actions such as:
- name clippings
- create or edit text clippings
- delete clippings
- remove formatting from text clippings
- store file aliases
- open file aliases (original file)
- show file aliases in the Finder
- open Internet address clippings
- copy or move clippings to other sets
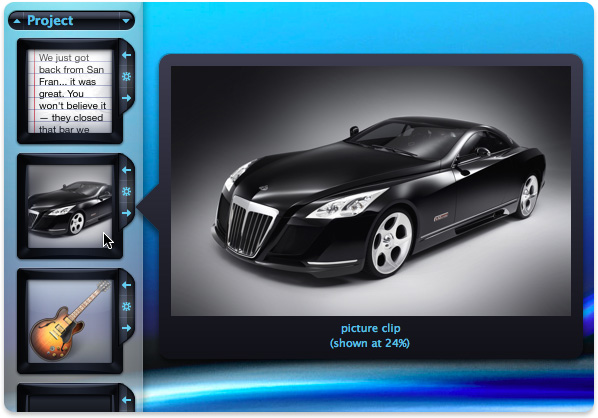
Drag & Drop
Another way to get clippings to and from iClip is to use drag & drop. You can drag clippings from applications and drop them onto iClip clip bins to store copies of them in iClip. You can then drag them from the bins and drop them back into your applications when you need to use them.
dragging & dropping a picture clipping from Safari to iClip
In addition to being able to drag & drop clippings from documents into iClip, you can also drag & drop text documents and various picture documents from the Finder into iClip. iClip will create clippings from the contents of these documents and store them in the clip bins they're dropped on.
Instead of dropping items into the clip bins they can also be dropped onto the Add Clip Bin button. In this case the dropped item(s) will be added into free bins of the current clip set, one bin per dragged item. This allows you to quickly add multiple files from the Finder to a clip set, for instance.
You can arrange the clippings in the clip bins by dragging & dropping them from one bin to another, thereby swapping the positions of the two bins. You can also drop them in between two bins (note the change of the mouse cursor) to move clippings into the new position.
To sort the clippings in a set by their type, creation time, name or content, use the Keep Sorted By command from the Edit menu.
File Aliases
You can use iClip to store references to files in clip bins, allowing iClip to be used as a “file launcher”. Such file references are called file aliases in iClip, and they are effectively behaving like Aliases in the Finder.
You can store a file alias to virtually any file (applications, documents, folders, etc.).
If you drop files from the Finder into iClip, iClip may ask you if you want to store them as a file alias if iClip cannot store the file contents directly (which it can do for texts and images, for instance). To force iClip to store a file alias, you may hold down the Option and Command keys while dragging the file over a bin. The mouse cursor will then indicate with a little arrow that iClip will create a file alias.
Choosing Store File Alias… from the Action button pop-up menu of an empty clip bin opens a dialog that lets you choose the file to store a file alias to in the bin. Double-clicking a file alias clipping will open it (this behavior can be changed in the Preferences, under the Hot Clicks section.
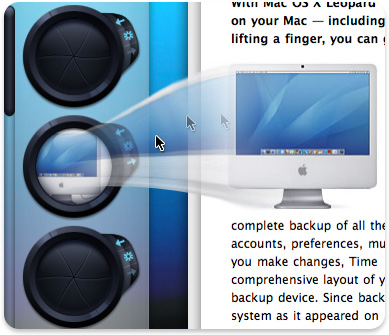
Pop-up Previews
Moving the mouse cursor over a clip bin for a moment displays a pop-up preview of the contents of the clipping.
a pop-up preview of a clipping
Deleting Clippings in Clip Bins
To delete the clipping that a clip bin contains, click the Action button next to it and choose Delete Clipping (in the Recorder Set) or Clear Bin (in other Clip Sets) from the pop-up menu that appears. Dragging a clipping to the trash will also remove the clipping from the bin.
To delete the clippings in every bin of the current clip set, choose Clear All Bins in Current Clip Set… from the Edit menu.
If a Clip Set has empty bins between non-empty ones, you can remove the empty gaps and pack all clippings together by choosing Delete Empty Bins from the Edit menu.
Adding and Removing Clip Bins

Add/Remove Clip Bin buttons
To quickly add a new clipping bin to the end of the current clip set, click the Add Clip Bin button. Likewise, to quickly remove the last clip bin in the current clip set, click the Remove Clip Bin button.
Please note that removing clip bins will also remove any clippings that are stored in them.
Finding Clippings
You can search for clippings using the "Search Clippings…" Hot Key or command under the Edit menu.
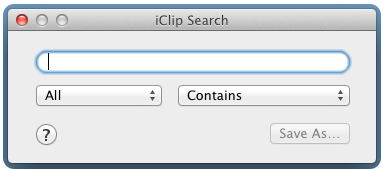
Search window
Choosing what to search
- All - Searches text, names and kind as well as the application name a clipping was created from.
- Name - Searches explicitly entered clipping names only, i.e. no implicit names of Alias files.
- Kind - Searches clippings of certains types (text, plain, styled, RTF, PDF, picture, web, address, alias, fileref, filemaker, unknown).
- Application - Searches for clips by the names of applications they were copied from.
Choosing how to search
- Contains - Matches text exactly as typed.
- Word Beginnings - Matches one or more words, separated by spaces.
- Advanced - Allows you to use OR, NOT and NEAR operators. See examples below.
Note: The search is case insensitive, but only for plain Roman letters (a-z), not for accented letters.
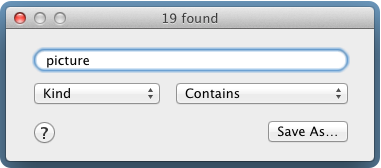
Example: Finding all pictures
Using the "Advanced" search option
Advanced search uses the sqlite FTS Standard Query Syntax.
You can use the following special terms in the search:
- A word is only found if it's complete, unless it ends in a "*" (asterisk).
- If the search contains several words, they must all exist in the to-be-found clippings.
- By using OR (must be upper case) alternatives of words may be looked up.
- By quoting text, it must occur exactly as written.
- Prepending a word with "-" (minus) means to exclude clips containing that word.
- The NEAR operator requires words to be within a distance of 10 words. Using NEAR/ followed by a number specifies a different maximum distance.
- Prepending a word with either name:, content:, appname: or appid: limits the search to a clipping's name, text, application name or application bundle ID.
As an example, consider a plain text clipping with the following text in it:
If you don't find it in the index, look very carefully through the entire catalogue.
| Finds the clipping | Does not find the clipping |
|---|---|
| you don't | you do not |
| don't you | "don't you" |
| careful* | careful |
| index | index something |
| index OR something | index or something |
| index -something | index -catalogue |
| index NEAR catalogue | if NEAR catalogue |
| index NEAR/6 cata* | index NEAR/5 cata* |
| index kind:text | index kind:styled |
| index kind:plain | index kind:pdf |
Saving a Search
You can save a search so that it becomes a Smart Search Set. Saved searches will appear below the normal Clip Sets, prefixed with a small loupe symbol before their given name.
They will update automatically whenever Clippings get added, removed or changed.
For instance, you could save a search for images by entering "picture" and then setting the two popup menus to "Kind" and "Contains", then save under the name "All Images". Then you can switch to the "All Images" set at any time to see all images in any of your Clip Sets.
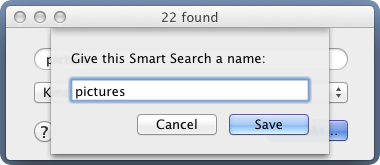
Saving a Smart Search Set